A step-by-step guide to Deploying a functional Web application on Docker.

Detail-oriented and dedicated Cloud/DevOps Engineer with experience in designing, deploying, and managing cloud infrastructure across Azure, AWS and GCP environments. Strong expertise in cybersecurity, system administration, and incident management. Proven history of success in IT support roles, with proficiency in Linux and Windows server administration, virtualisation, identity management, and Active Directory. Committed to enhancing security, optimising system performance, and ensuring the reliability of IT infrastructure.
Understanding Docker and Docker Images
Docker is a powerful platform that allows developers to create, deploy, and run applications in containers. Containers package everything an application needs to run: the code, dependencies, libraries, and even the system settings. This ensures that the app runs consistently across different environments, whether it's on your local machine, a server, or in the cloud.
Docker was introduced by Solomon Hykes at Pycon 2013. It quickly gained traction among developers after being open-sourced as a tool for automating the deployment of applications in lightweight containers.
Containers are lightweight and more efficient than traditional virtual machines, as they share the host machine's OS kernel and isolate applications in a secure, portable environment.
How can I make use of Docker?
Your apps will be delivered consistently and quickly.
By enabling developers to operate in standardised settings with local containers that host your apps and services, Docker simplifies the development lifecycle. Workflows involving continuous integration and continuous delivery (CI/CD) benefit greatly from containers.
Think about the following hypothetical situation:
Using Docker containers, your developers collaborate with one another while writing code locally.
They execute both automatic and manual testing on their apps by pushing them into a test environment using Docker.
When bugs are discovered, developers may address them in the development environment before redeploying the updated code to the test environment for verification and testing.
After testing is over, pushing the updated image to the production environment is all that is needed.
What Are Docker Images?
A Docker image is a lightweight, stand-alone, executable package that includes everything needed to run a piece of software. Think of it as a blueprint for containers. Docker images contain the application's code, along with any necessary libraries, configuration files, and settings. Once built, they are used to create containers.
Key characteristics of Docker images:
Layered: Images are built in layers, with each layer representing a different step in the build process (e.g., installing dependencies, copying files). This makes them reusable and efficient.
Portable: You can share and deploy Docker images across any system that supports Docker, ensuring consistency.
Versioned: Each image can be tagged with different versions, allowing you to track changes over time.
In simple terms, Docker simplifies the deployment process by ensuring your application runs the same in development, testing, and production environments. Docker images are the building blocks of this process, as they define what gets packed into a container and how the app is configured.
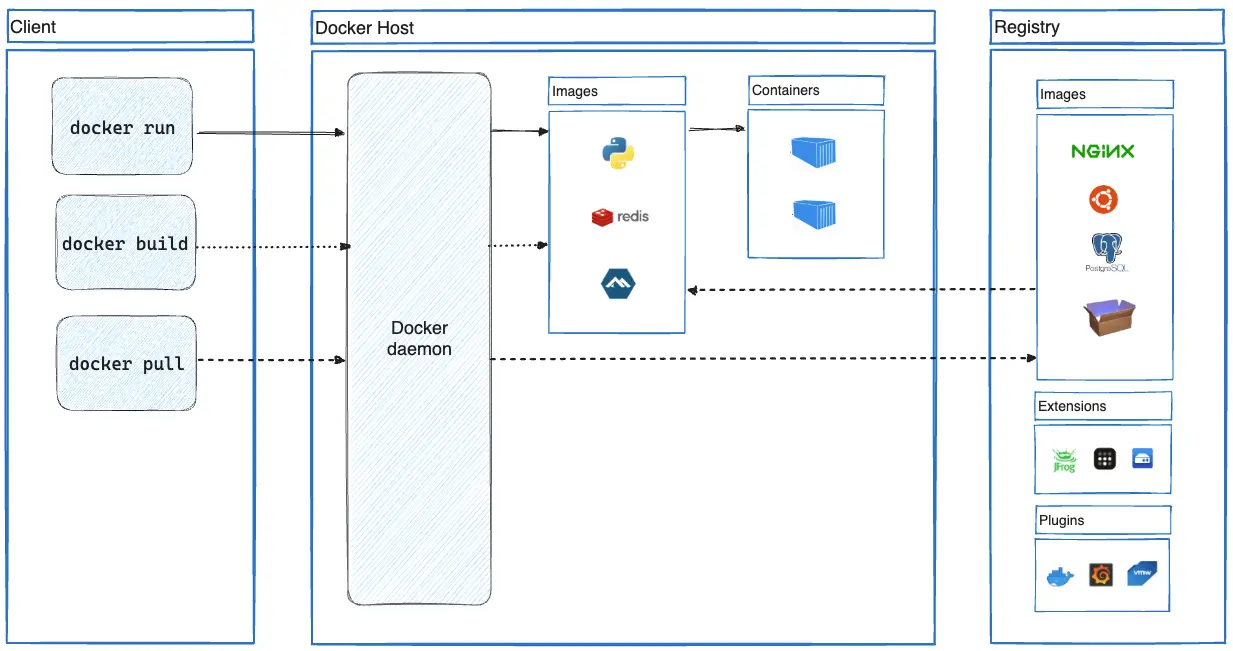
Docker Architecture - Image obtained from Docker documentation.
How to Deploy a Functional Website on Docker: Step-by-Step Guide for Beginners.
If you’re new to Docker and want to deploy a website using a Docker image, you're in the right place! In this step-by-step guide, I’ll show you how to containerize your website and deploy it using Docker. By the end of this guide, you’ll have your website running in a Docker container and accessible in your browser.
Prerequisites:
Before starting, you’ll need the following:
Docker installed: Download and install Docker for your operating system. Docker Installation Guide.

A simple website project (HTML, CSS, JS). If you don’t have one, you can create a basic
index.htmlfile with some content.
I will be using a web application called kconcpet on my local PC.
Ensure that the Docker environment is opened.
Step 1: Set Up Your Project Files
First, prepare the folder structure for your website. The folder should contain your index.html, CSS, JavaScript files, images, and other related assets or resources. Your folder may look something like this:

Step 2: Create a Dockerfile
To package your website into a Docker container, you need a Dockerfile. This is a simple text file that contains the instructions Docker will use to build your image.
Inside your website folder, create a file named
Dockerfile(no extension) or use Visual Studio code editor or any order code editor.Open the file in a text editor and add the following lines:
# Step 1: Use an official Nginx image as the base
FROM nginx:alpine

# Step 2: Set the working directory to Nginx's HTML directory
WORKDIR /usr/share/nginx/html

# Step 3: Remove the default Nginx index page
RUN rm -rf ./*

# Step 4: Copy your web files from the local machine to the container
COPY . .

# Step 5: Expose port 80 to access the web server
EXPOSE 80

# Step 6: Start Nginx
CMD ["nginx", "-g", "daemon off;"]

Save the
Dockerfile.Ensure that your
Dockerfileis in the same folder as all the contents of the kconcept folder.
Step 3: Build the Docker Image
Now, we will use the Dockerfile to build a Docker image.
Open a terminal (command prompt or PowerShell for Windows, or a terminal on Linux/Mac or from your VsCode editor).
Navigate to the directory containing your website and
Dockerfileusing thecdcommand:cd path/kconcept
Run the following Docker build command:
docker build -t kconcept .

Step 4: Run the Docker Container
After the Docker image is built, you can run it inside a container to serve your website.
Run the following command to start a container from your image:
This command:
docker run -d -p 8080:80 kconcept-druns the container in detached mode (in the background).-p 8080:80maps port 80 of the container (where the website is served) to port 8080 of your local machine.

Your website is now running in the container. Open your browser and navigate to:
http://localhost:8080
You should see your website!

Step 5: Manage and Verify the Docker Container
To check if your container is running, use:
docker ps
This command lists all running containers. You should see something like this:

If you want to stop the container, run:
docker stop <container-id>

To restart it again:
docker start <container-id>

Step 6: (Optional) Push the Docker Image to Docker Hub
If you want to share your website’s Docker image with others, you can push it to Docker Hub.
First, create an account on Docker Hub.
Log in to Docker from the terminal:
docker login

Tag your image for Docker Hub:
docker tag kconcept <your-dockerhub-username>/kconcept

- Push your image to Docker Hub:
docker push <your-dockerhub-username>/my-website


Recap
By following this guide, you’ve learned how to:
Create a
Dockerfileto define how to package a website.Build a Docker image using the
docker buildcommand.Run the Docker container with
docker run.Optionally, push your image to Docker Hub for sharing.
Now you can package and deploy any website you create using Docker!
Feel free to explore more features of Docker, such as deploying your image on cloud platforms like Azure or using orchestration tools like Docker Compose to manage multi-container applications.
Happy containerizing! 🎉


